Sunday, October 25, 2009

Easy No-Sew Halloween Party Flags*

IMG_2784

*actually, I did sew them, but you can make them without sewing...I want my friends who don't sew to try this!

*and there doesn't have to be a party either.

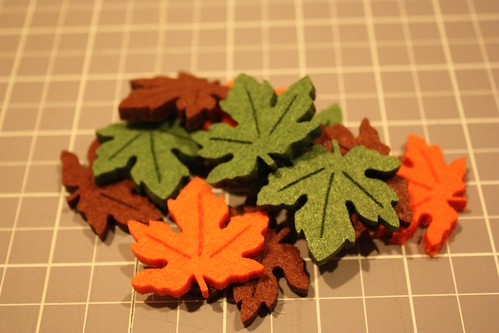
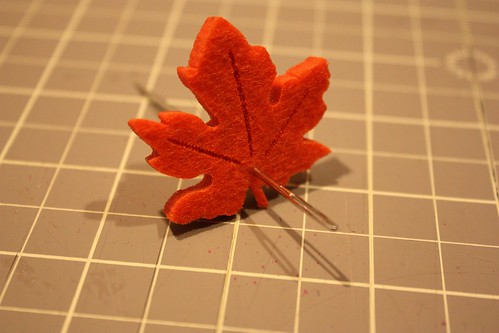
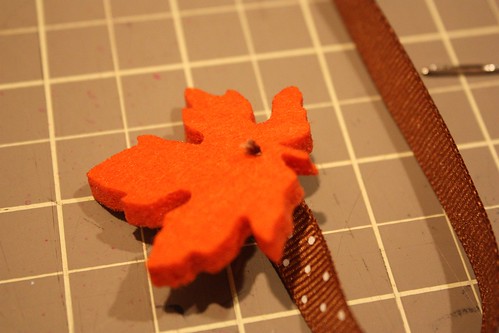
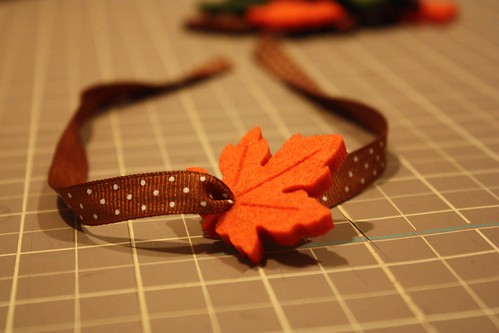
Just so you know...this was not my idea. There are TONS of flag garlands out there in the blogosphere and I was inspired by one I saw out there somewhere. For lots and lots of inspiration, click here to check out the Flickr group, Ga-ga for Garlands. I have made many (will share more later!), they are so quick and such a cute and unique way to decorate for kids' birthdays and holidays, and also to hang in kids rooms. The possibilities are endless and you can obviously use fabrics to suit any occasion. I was walking through Pottery Barn Kids last week and saw this felt leaf garland for SIXTY dollars...

leaf garland

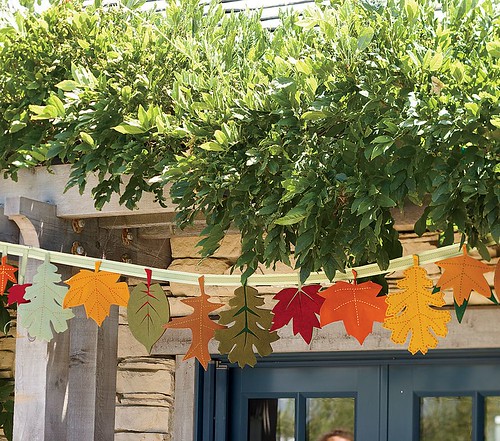
...and I think I can make something similar. I try to hang a seasonal one in the kids' playroom so maybe I'll try to copy this.

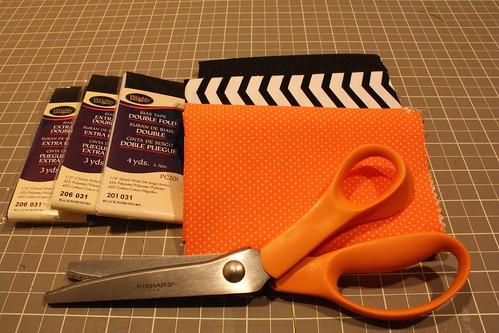
OK, so for the Halloween party flags, you'll need:
assorted fabric
bias tape
cardstock
pinking shears
sewing machine or fabric glue (I recommend Fabri-Tac or Liquid Stitch)

IMG_2771

You can use as many different fabrics as you like. If you trace them close together, you should be able to get about 12 triangles out of 1/4 yard of fabric. I had three different fabrics, so with 1/4 yard of each, I could make a banner with 36 flags, or about 18 feet long (that's pretty long...mine only has 14 flags).

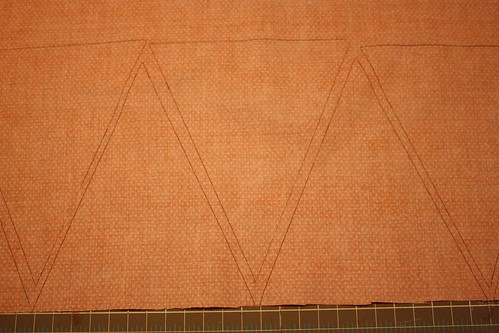
Cut a template from cardstock to trace your triangles with. My triangles are 6" across the top and 7" from top to bottom. To make a perfect triangle, first make a 6X7 rectangle, mark the midpoint on one of the short ends, and then draw a line from each of the opposite corners to the mark you made.

perfect triangle

Trace the triangle on your fabric, alternating upside-down ones to get as many in without wasting fabric.

IMG_2741

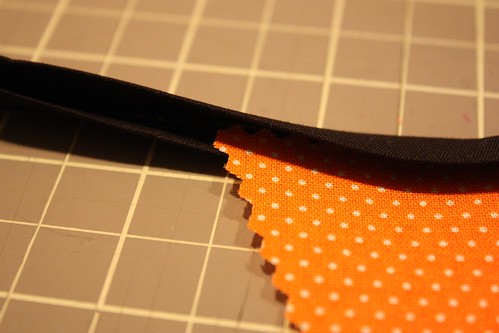
Cut out with pinking shears.

IMG_2775

Now you'll need your bias tape. Use extra-wide double fold.

IMG_2777

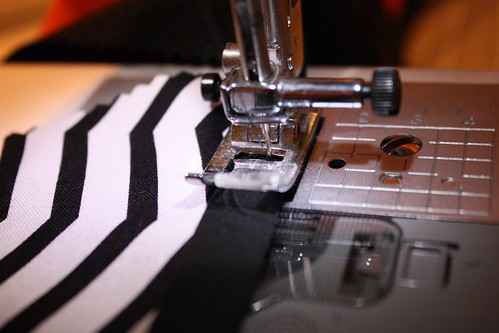
Sandwich the triangles in the fold of the bias tape and sew through all layers with a zig-zag stitch, alternating your flag colors however you like.

IMG_2781

IMG_2783

Or, open up bias tape and apply a thin line of glue to the bottom half and place a flag on top, working one flag at a time. When all flags are glued down, use more glue to glue down top flap of bias tape.
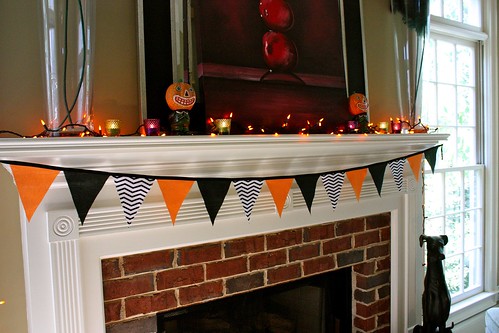

IMG_2788

All done!

I also made a mini flag banner that I hung across the mirror in our entryway. For this one, my triangles were 2" by 3" and I used the thin bias tape instead of the extra-wide. It's little and cute!

IMG_3310

Ohhh...let's get a better look at that candy...

IMG_3307

Yum! I hope the Great Pumpkin brings you many treats this year. And speaking of the Great Pumpkin, LOOK at this fabric I found!!! I love it!

IMG_2795

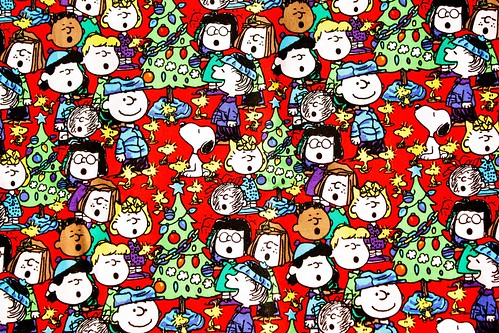
I think I'm going to make a tablecloth with green pom pom trim for the kids' playroom. They won't know who these characters are and when they're old enough to watch the Peanuts specials on TV, I will force them to watch and they'll probably hate it. So the tablecloth is really for me!!!

Anyway, back to Halloween...have a great one!!! Be back soon, hopefully to post pictures of my homemade costumes!

IMG_3299

Tuesday, October 13, 2009

Make it: Fall Hair Ribbons

IMG_2799

I found these felt leaves at Hobby Lobby and knew I could make something cute with them!

IMG_2733

I decided to do cute hair thingies. They will work for all of October & November, Halloween & Thanksgiving.

You can make these too (in about 5 minutes!) with these supplies:

IMG_2770

ribbon
felt leaves or other fall decoration from the craft store
giant needle or tailor's awl (I used a dollmaker's needle {no, I don't make dolls...not yet anyway...hmmm}, but just use the biggest needle of any kind that you have)
Fray Check or superglue

Here's what you do:
Poke the needle through the leaf. Go back & forth a bunch of times and move it around in circles to try to get your hole big enough for the ribbon to go through.
IMG_2749

Cut at least 18 inches of ribbon for each one. My girl has skinny hair so 18 inches was enough.
IMG_2745

Make sure your ribbon is cut on an angle and thread just the very end of it (not the whole ribbon) through the eye of the needle.
IMG_2751

Poke needle through leaf and try to pull ribbon through. This part is tough. It took me a few tries. Once you can get just the tiniest bit of the ribbon through,
IMG_2753
you can now grab the ribbon with your fingers and pull it through to center the leaf on the ribbon.

But now the edges of your ribbon are screwed:
IMG_2756

So cut the ends off
IMG_2757

and grab your Fray Check (or superglue).
IMG_2761

Put the tiniest bit on the ends of your ribbons...
IMG_2766

...and you're done!
IMG_2737

Now tie them in that cutie's hair...
IMG_2886

...and let her frolic outside in the leaves!
IMG_2849
{once they start falling!}

Happy Crafting!
IMG_2891

Monday, October 5, 2009

FUN dinner for a fall night

pear & gorgonzola pizza

I've been making this pizza for a few months now and can't stop thinking about it. If you know John, you know he deems some foods "fun" and others "sad". For example, if I made a pot roast with vegetables and mashed potatoes on a Saturday night, he would want to cry. Not that I ever made pot roast, but just an example. Most things would be considered sad, actually. Anyway, it mostly has to do with the day of the week. I can't make a "sad meal" on a Thursday, Friday, Saturday, or Sunday night. And now John is gone every Monday, Tuesday, and Wednesday night, so do the math. I must come up with 100% fun meals 100% of the time. Anything in the pizza or Mexican family is fun. That's pretty much it though. So I have made about 237 varieties of tacos, quesadillas, and the like. I make pizza a lot too, and our old standby used to be one that we tried to copy from one of our old favorite restaurants from when we lived intown (pre-kids), called fritti. Theirs, called pancetta e cipolla, is with carmelized onions, pancetta, and hot pepper flakes. So perfect in every way. Mine was carmelized onions, ham (pancetta is obviously way better, but I use ham to keep the calories down), and hot pepper flakes. It's super good and I highly recommend you try this sometime. Let me know if you want more details on how to make. Now that's what brings me to my point here. I have made that ham and carmelized onion pizza probably about 100 times. But then I discovered my true pizza love...pear & gorgonzola pizza.

Yummmmmmmmmmmmmm.

This one I copied from California Pizza Kitchen. Every time I make pizza now I want to make this one. I love my fritti knockoff, but it does not compare to this. This is probably a bizarre combination to many people, but you must try. Here's what I do:

Carmelize a red onion. Start with a small red onion or half of a large one (or whatever you like...I like onions so I might use more). Cut the onion in half and then slice it into half-rounds. Throw it into a pan with a little olive oil and about a half teaspoon brown sugar and cook it on very low until it's all sweet and perfect, about 45 minutes (I know, that's a long time, but just plan ahead. Sometimes I do this in the afternoon so it's ready).

Roll fresh dough out to desired size and bake on pizza stone preheated to 500 degrees for about 5 minutes, or until it just starts to brown on top. If you don't have a pizza stone, that's OK...just do it on a round pan. You'll have to prick the top with a fork all over about 2 minutes after it goes in. You could do this before it goes in, but I don't like to because it screws up the shape of the dough that I just spent 5 minutes rolling out.

While the dough's in the oven, get the pears ready. I use 2-3 pears...peel them, core them, slice them. The onions should be done, so take them out of the pan and set aside. Use the same pan for the pears, just throw a pat of butter in there, melt it on medium and then cook the pears until soft, flipping them over once. You probably don't have to use the butter, but c'mon people........this is Saturday night! You didn't get to go out because you have two little gremlins up in bed....so have some fun here!

OK...now the dough is out and has had some time to cool. You could brush it with a little olive oil around the outside crust, but I don't always do this. Cover with mozzarella cheese (half the amount you want to use), then cover evenly with the pears, onions, & the other half of your cheese. Now sprinkle it with some chopped walnuts or hazelnuts. Oh my gosh.

Put it in the oven for about 10 minutes. Watch it closely, I don't want to be responsible for all your chopping, slicing, rolling, carmelizing, and assembling coming to a blackened, fiery end. Mine is usually in there about 10 minutes, but that's at 500 degrees...so it's hot in there.

When it comes out, it looks like this:

pear & gorgonzola pizza, fresh from oven

Then, you toss some field greens (or some people call this spring mix?) with a little bit of blue cheese dressing (!!!) and throw it on top of the pizza. I use Ken's light. You probably don't have to do this if lettuce on pizza is just too weird for you, but if you're making a pear pizza to begin with you might as well just go with it. Sprinkle evenly with crumbled gorgonzola cheese.

pear & gorgonzola pizza

And there you go. Heaven on a plate on a Saturday night (or a Thursday, Friday, or Sunday, but definitely not a Monday). Let me know if you make this and how you like it. Just remember to have a cocktail while you're making and eating it. And you can definitely come over and I will make it for you so you don't have to do any of this. Because then I get to have some too. But poor John, well...he'll have to have fish sticks.

Sunday, October 4, 2009

Pumpkins

IMG_2683

Jane can barely wait until Halloween...she was SO excited to go to the pumpkin patch today and was jumping and dancing with joy when we got there. It is so cute to watch her and so fun that she's finally at the age where she gets it. She informed us MONTHS ago that she would like to be a mermaid this year and we thought she might change her mind by now, but she's stickin' to it. I'm making her costume (and Kate's) so please pray for me, thanks. Will definitely show pictures of the creations (or abominations?) when I finish!!!

IMG_2578

IMG_2634

And this is what her face looks like when she gets candy. See it there in her hand?

IMG_2725

Kate had fun too...climbing all over the pumpkins....even though there are signs everywhere that say PLEASE DON'T CLIMB ON THE PUMPKINS. But how much damage can a sixteen-pounder do???

IMG_2587

Checking out the pumpkins for the first time with Uncle Jimmy:

IMG_2565

IMG_2668

The Hayride:

IMG_2688

IMG_2687

IMG_2700

IMG_2694

IMG_2713

And a tractor to sit on...

IMG_2625

IMG_2652

IMG_2616

My mom sent their outfits...Thanks Mom, they're adorable!!!

Jane is so funny how she imitates us. All day today after we left, she kept saying, "Did you have fun on the hayride today, guys???" She kills us...

We did have fun, Jane. And Happy Birthday Lauren, Mike, & Carly!!!